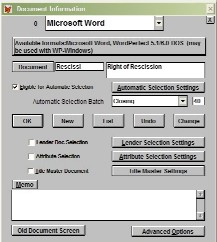
Click
the Info menu, then Document Setup to
open the Document Information screen. Click
the List button and retrieve the document for
which you want to change the selection settings.
For
a document to be included in a print batch, the Eligible
for Automatic Selection box must be checked. (You
can remove a document from a print batch by unchecking
this box.) Set the print batch for the document by
clicking the drop-down menu to the right. In this
example, the Right of Rescission document (Rescissi)
will appear in the Closing (40) batch.
Next,
you can review or change the criteria under which
this document will appear in the chosen print batch.
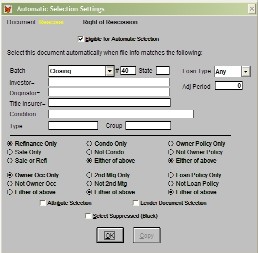
Click the Automatic Selection Settings button
to open the Automatic Selection Settings screen.
The options you set here will cause this document
to appear in the print batch only when these specific
conditions are met.
In
the example, "Rescissi" is set to appear
only for refinance transactions and when the property
is owner occupied. Notice that documents can also
be set by condominium, second mortgage, title insurance
criteria. Choosing Select Suppressed (Black)
causes the document to appear suppressed (black) in
the print batch. Use this setting for documents that
you need occasionally.
Fields
in the top half of the Automatic Selection Settings
screen allow you to set a document to appear only
for one state, loan type, investor, originator or
title insurer. The Condition field can contain more
complex rules that you should not add or change without
speaking with Standard Solutions technical support.